
 Packing serious bass into your ride means going way beyond a simple sub in the trunk. Building a custom car subwoofer wall transforms your entire system, bringing thunderous low-end and loud, clean bass that turns heads at every stoplight. A proper sub wall setup doesn’t just boost sound; it changes the whole vibe of your car’s interior and your listening experience.
If you’re curious about how to build a subwoofer wall for your car, you’re definitely not alone. The process can look a bit complicated at first, but with a step-by-step plan and the right tools, it’s surprisingly manageable—even if you’re not a pro installer. I’ve built a few myself, and once you hear how hard they hit, it’s pretty hard to go back to a regular sub box.
Here’s a complete, no-nonsense guide on how to tackle a car subwoofer wall build, from picking the best spot to tuning your system for knockout performance. Whether you’re after chest-thumping SPL or just want your favorite tracks to come alive in a way that gets noticed, building a subwoofer wall could be your next-level cool car audio project.
Step 1: Understand What a Subwoofer Wall Is
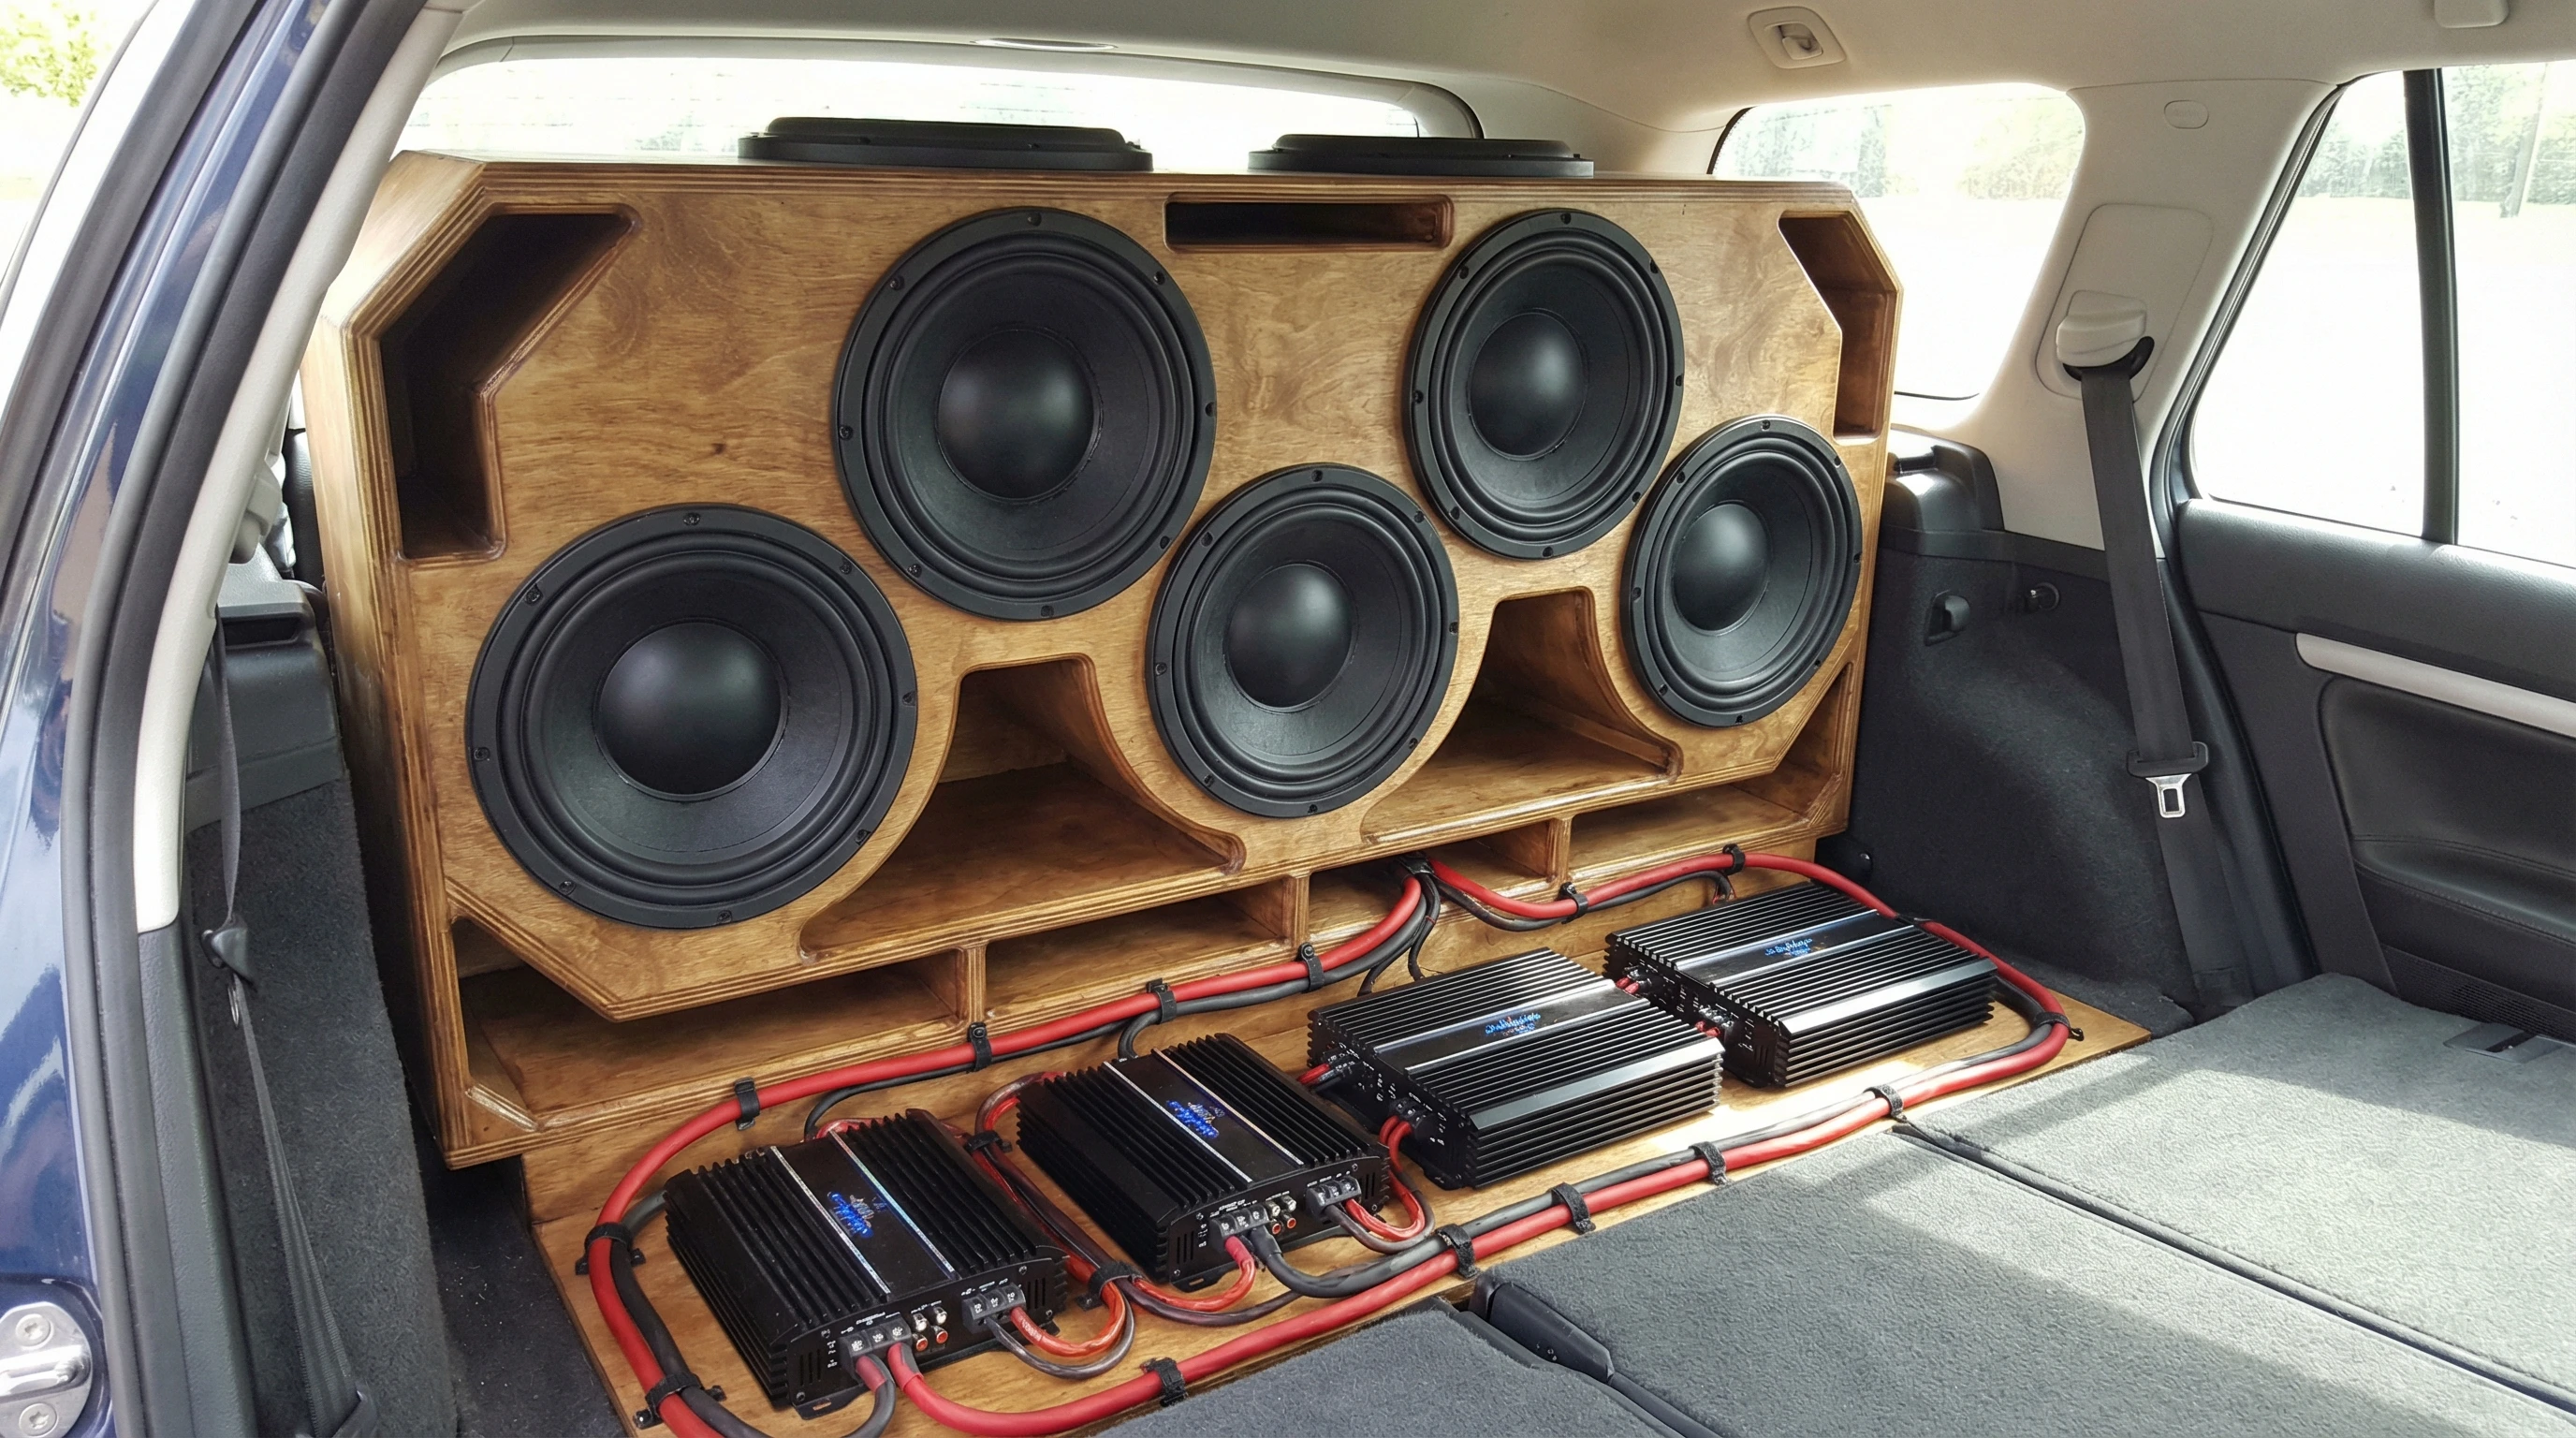
A car subwoofer wall is a custom built enclosure that holds multiple subwoofers, usually mounted all the way across the back seat or trunk area. Instead of a single box, everything is sealed off with strong panels so bass can reflect inside the car, making each note hit a lot harder than a typical trunk setup.
- Typically takes up the whole rear seat area or part of the trunk.
- Maximizes the airspace available for your subs, which means more output and deeper bass.
- Creates a visual showpiece as well as an audio upgrade.
This type of enclosure really suits people who want loud and powerful sound, and don’t mind giving up some interior space for the experience. These builds set your car apart at local meets, becoming an instant conversation starter with fellow audio fans.
Step 2: Choose the Right Equipment
Getting the right gear is super important, because building a sub wall isn’t something you want to do twice. Before anything else, decide how much bass you want and what space you’re willing to lose inside your car. Building a sub wall means you need to balance your bass cravings with daily driving comfort, so check in with your needs and budget first.
What You’ll Need:
- Subwoofers: Most builds use at least two, but serious setups often rock four, six, or even more 10″ to 15″ subs.
- Amplifiers: Make sure your amp matches your subs’ power needs. Too little, and your system will fall flat; too much, and you risk blowing speakers.
- MDF or birch plywood: These materials are strong, dense, and deliver better sound quality for walls and enclosures.
- Fasteners, sealant, terminals, and wiring: You’ll want high quality stuff here to avoid rattles, leaks, or electrical issues down the road.
- Carpet, vinyl, or other finishing materials: Gives your build that clean, custom look so it doesn’t just sound good—it looks eye-catching, too.
It’s smart to sketch your idea and map out exactly how much material you need before you start shopping. Having a clear plan means less running back and forth and a more satisfying outcome.
Step 3: Plan and Measure Your Space
Accurate measurements make or break a subwoofer wall project. You’ll want to block out every inch you can use while making sure you can still get the subs and wall in and out if something ever needs fixing. Here’s how I handle it:
- Measure the width, height, and depth of your chosen space, usually right behind the front seats or in the trunk.
- Factor in the subs’ mounting depth, the thickness of enclosure material, and the need for any support braces inside.
- Check the required airspace for your chosen subs (usually listed as “recommended enclosure volume” in the manual or online).
Try to keep your design as tight as possible for a professional fit, leaving enough space for wires and cooling airflow, especially behind the amp racks. Doing this saves time and headaches later. Also, consider if your vehicle will be used daily or for shows. Some folks even add LED lighting or plexiglass windows for extra flair.
Step 4: Build the Enclosure Structure
This is the fun (and sometimes messy) part. Take your measurements, draw your cut lines, and get to work with your saw.
Build Tips:
- Cut front, back, top, bottom, and side panels from MDF. Dryfit them first before gluing or screwing anything together. Mistakes are a lot easier to fix before glue sets.
- Assemble the panels using strong wood glue and screws every few inches. Clamps help keep everything tight and free from gaps.
- Add internal bracing so the panels don’t flex or vibrate when the bass is pumping. More bracing means less unwanted noise and tighter bass response.
- If you’re building a sealed wall, make sure all edges get a thick bead of silicone sealant, especially where panels meet. For ported designs, add the port(s) based on sub specs and desired tuning.
Let the enclosure cure for at least a few hours, ideally overnight, before adding equipment. Taking your time during this step really pays off because once the structure is solid, everything else goes much smoother.
Step 5: Mount and Wire Your Subwoofers
With the box ready, it’s time to fit the most important bit: the subs. Most people cut the sub holes with a jigsaw based on the manufacturer’s template, then check fitment before final mounting. If you use multiple subwoofers, lay out the spacing to make sure magnets and baskets don’t touch.
- Secure your subs with the hardware included, making sure the seal between the sub and box is tight. Foam or rubber gaskets really help here.
- Run heavygauge wire from the amps to the sub’s terminals. Short runs and clean connections equal less risk of voltage drops or weird noises.
- Take your time with wiring for power, ground, and signal lines. Route wires away from sharp edges and moving parts. Nobody wants a ground loop humming through their fresh install.
At this stage, double check all connections before you hit the power. If you can, use a multimeter for peace of mind that your wiring is spoton. Labeling your wires can also help future upgrades or repairs.
Step 6: Test, Tune, and Finish the Build
Power everything up and play some music before locking in the wall. Look (and listen) for any buzz, rattle, or air leaks, then fix them now. These issues only get more annoying over time. Common problem spots are corners, seams, and where wires pass through the enclosure.
After Testing:
- Secure the wall to your vehicle’s chassis using brackets or solid mounts. A wall that shifts around can damage your ride and the speakers.
- Tweak your amplifier gain and crossover settings to match your subs and music taste. A little tuning goes a long way for balanced, distortionfree sound.
- Cover up your wall with carpet, vinyl, or custom panels. It not only gives your build a finished look, but can also help with sound quality by reducing reflections or rattles.
Once you’ve tuned everything, it’s time to crank up your favorite track and enjoy the fruits of your labor. A real subwoofer wall is a total game changer; you’ll hear and feel the difference every single drive. Show off your hard work to friends or bring your ride to a local car audio event—the response is always worth it.
Top Troubleshooting Questions
What if my bass sounds weak after building my wall?
This is usually about incorrect airspace, bad wiring, or weak amplifier settings. Double check your sub’s recommended specs, remeasure your enclosure’s internal volume, and inspect wiring for issues. Small missteps here can really affect output, so be thorough.
How do I stop rattles or vibrations?
- Use extra bracing inside your wall enclosure.
- Add sound deadening material to panels and car surfaces nearby.
- Tighten all screws and bolts after each test drive; vibrations can loosen things over time.
Is this reversible—I need my seat back in later?
If you plan to reverse the install, design your wall as a single piece with removable mounts, and store your original seat parts. It takes a little extra effort, but it makes swapping back a lot easier down the road. Some builders also take stepby-step photos so the original layout can be restored without guesswork.
Key Tips for a ProLevel Subwoofer Wall
- Plan your enclosure size based on your subwoofers’ specific needs and desired sound.
- Always use solid, high quality materials and hardware for safety and performance. Don’t cut corners here.
- Double check fitment before final assembly or gluing.
- Keep wiring neat and well insulated to prevent headaches later on.
- Don’t skip tuning; dialing in your system can give a boost to both sound quality and volume.
If you’ve got the itch for big bass and the patience for a super detailed build, a subwoofer wall is one of the coolest DIY upgrades for any car audio fan. If you have questions as you work through your project, drop them in the comments or check out dedicated car audio forums for tons of inspiration and pro tips. Remember—careful planning and attention to each step will set your build apart and keep you bumping for years to come.